How To Connect Raspberry Pi To AWS IoT: The Ultimate Guide
Connecting your Raspberry Pi to AWS IoT might sound intimidating, but trust me, it's easier than you think. AWS IoT provides a seamless platform to manage your IoT devices, and Raspberry Pi is one of the most popular single-board computers out there. If you're looking to build smart home solutions, remote monitoring systems, or even industrial automation, this setup is your golden ticket. So, buckle up, because we're about to dive deep into the world of IoT magic!
Imagine having a Raspberry Pi that can talk to the cloud, send data, and receive commands in real-time. Sounds futuristic, right? Well, it's not as far-fetched as you might think. AWS IoT Core is designed specifically for this purpose, and with just a few steps, you'll have your Raspberry Pi up and running in no time. Whether you're a hobbyist or a professional developer, this guide will walk you through every step of the process.
Before we get started, let's clear the air. This isn't just another tech article filled with jargon. We're going to break it down step by step, making sure you understand every single detail. From setting up your Raspberry Pi to configuring AWS IoT Core, we've got you covered. Let's make this journey as smooth as butter!
Why Should You Connect Raspberry Pi to AWS IoT?
Now, you might be wondering, why bother connecting Raspberry Pi to AWS IoT in the first place? Well, here's the deal: AWS IoT offers scalability, security, and reliability that are hard to beat. Whether you're building a small-scale project or a large-scale industrial solution, AWS IoT has got your back. Plus, it integrates seamlessly with other AWS services, giving you endless possibilities for innovation.
Let's break it down further:
- Scalability: AWS IoT can handle millions of devices without breaking a sweat. As your project grows, you won't have to worry about infrastructure limitations.
- Security: With built-in encryption and authentication, your data is safe from prying eyes. AWS takes security seriously, and so should you.
- Reliability: AWS has data centers all over the world, ensuring minimal downtime and maximum performance. Your devices will always stay connected, no matter what.
So, if you're ready to take your IoT projects to the next level, connecting Raspberry Pi to AWS IoT is the way to go. Let's get our hands dirty and start setting things up!
What You'll Need to Get Started
Before we dive into the technical stuff, let's make sure you have everything you need. Here's a quick checklist to help you prepare:
Hardware Requirements
- Raspberry Pi (any model will do, but Pi 4 is highly recommended)
- MicroSD card with at least 16GB of storage
- Power supply for your Raspberry Pi
- Wi-Fi or Ethernet connection
Software Requirements
- Raspberry Pi OS installed on your MicroSD card
- AWS account with access to AWS IoT Core
- MQTT client (we'll use Mosquitto for this guide)
Once you've gathered all the necessary hardware and software, we can move on to the next step. But hold your horses, we're not done yet!
Setting Up Your Raspberry Pi
Alright, let's talk about setting up your Raspberry Pi. This is probably the easiest part of the whole process, but it's crucial to get it right. Follow these steps carefully, and you'll be good to go:
Step 1: Install Raspberry Pi OS
First things first, you need to install Raspberry Pi OS on your MicroSD card. You can download the latest version from the official Raspberry Pi website. Once you've downloaded the image, use a tool like Balena Etcher to flash it onto your MicroSD card.
Step 2: Configure Wi-Fi and SSH
Before you boot up your Raspberry Pi, make sure to set up Wi-Fi and SSH. Create a file named "wpa_supplicant.conf" on the boot partition of your MicroSD card and add your Wi-Fi details. Also, create an empty file named "ssh" to enable SSH access.
Once you've done that, insert the MicroSD card into your Raspberry Pi and power it up. Give it a few minutes to boot up, and you should be able to access it via SSH.
Creating an AWS IoT Thing
Now that your Raspberry Pi is up and running, it's time to create an AWS IoT Thing. This is where the magic happens. An AWS IoT Thing is essentially a representation of your device in the cloud. Here's how you can create one:
Step 1: Log in to AWS Management Console
Head over to the AWS Management Console and navigate to the IoT Core service. From there, click on "Manage" and select "Things". Click on the "Create" button to start creating your IoT Thing.
Step 2: Configure Your IoT Thing
Give your IoT Thing a name and select the "Create without a policy" option. Once it's created, you'll need to attach a certificate to it. AWS will generate a certificate for you, which you'll need to download and save securely.
After that, create a policy that allows your IoT Thing to interact with AWS IoT Core. Attach the policy to your certificate, and you're all set.
Installing AWS IoT SDK on Raspberry Pi
Now that your AWS IoT Thing is ready, it's time to install the AWS IoT SDK on your Raspberry Pi. This will allow your device to communicate with AWS IoT Core. Here's how you can do it:
Step 1: Update Your Raspberry Pi
Log in to your Raspberry Pi via SSH and update your system. Run the following commands:
sudo apt update && sudo apt upgrade -y
Step 2: Install AWS IoT SDK
Next, install the AWS IoT SDK. You can use the Python SDK for simplicity. Run the following command to install it:
pip3 install AWSIoTPythonSDK
Once the installation is complete, you're ready to move on to the next step.
Configuring AWS IoT Certificates
With the SDK installed, it's time to configure the AWS IoT certificates on your Raspberry Pi. This is where security comes into play. Follow these steps carefully:
Step 1: Copy Certificates to Raspberry Pi
Copy the certificates you downloaded earlier to your Raspberry Pi. You can use SCP or any other method to transfer the files. Place them in a secure directory, such as /home/pi/certs/.
Step 2: Update Configuration File
Update the configuration file for the AWS IoT SDK to include the paths to your certificates. Make sure the paths are correct, or your device won't be able to connect to AWS IoT Core.
Once you've updated the configuration file, test the connection to make sure everything is working as expected.
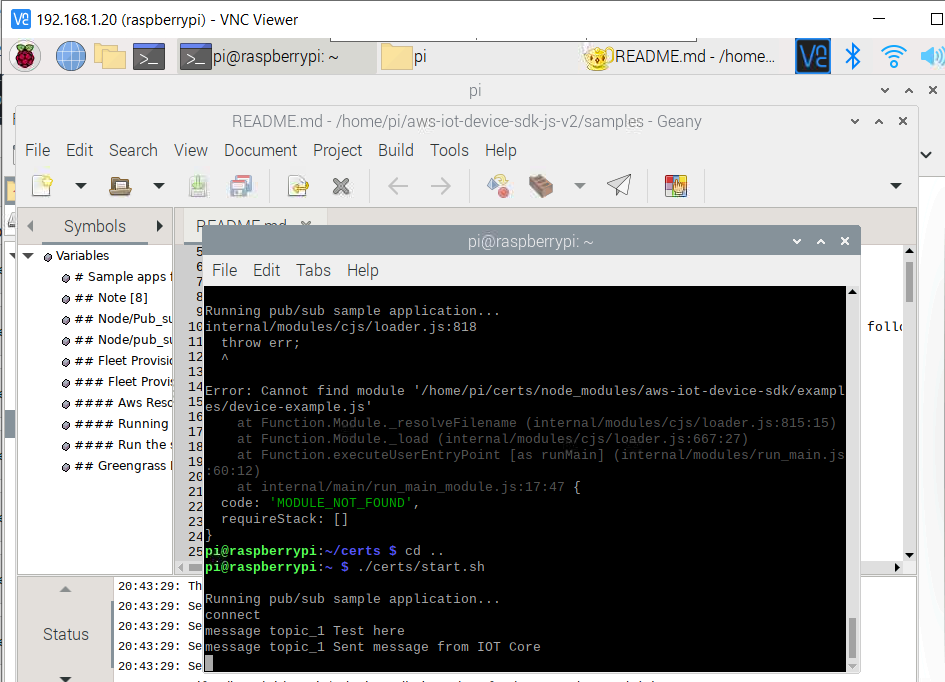
Testing the Connection
Finally, it's time to test the connection between your Raspberry Pi and AWS IoT Core. This is the moment of truth. Follow these steps to verify the connection:
Step 1: Run a Test Script
Create a simple Python script that publishes a message to a test topic in AWS IoT Core. Use the AWS IoT SDK to handle the connection and message publishing.
Step 2: Monitor the Logs
Check the logs on both your Raspberry Pi and AWS IoT Core to ensure that the messages are being sent and received correctly. If everything looks good, congratulations! You've successfully connected your Raspberry Pi to AWS IoT Core.
Advanced Features and Integration
Now that you've connected your Raspberry Pi to AWS IoT Core, let's talk about some advanced features and integrations you can explore:
Step 1: Use AWS Lambda for Automation
AWS Lambda allows you to run code in response to events, such as messages received from your IoT devices. You can use it to automate tasks, trigger alerts, or even send notifications to your phone.
Step 2: Integrate with Other AWS Services
AWS IoT Core integrates seamlessly with other AWS services, such as S3, DynamoDB, and Kinesis. You can use these services to store and analyze data from your IoT devices, giving you valuable insights into your projects.
Troubleshooting Common Issues
As with any technology, things can go wrong. Here are some common issues you might encounter and how to fix them:
- Connection Issues: Make sure your certificates are correctly configured and your Raspberry Pi has internet access.
- Message Delivery Failures: Check the topic names and ensure they match on both the sender and receiver sides.
- Security Errors: Verify that your policies allow the necessary actions and that your certificates are valid.
If you run into any issues, don't panic. AWS provides excellent documentation and support to help you troubleshoot and resolve problems.
Conclusion
Connecting your Raspberry Pi to AWS IoT Core opens up a world of possibilities for your IoT projects. From smart home solutions to industrial automation, the sky's the limit. By following this guide, you've taken the first step towards building innovative and scalable IoT applications.
Now it's your turn to take action. Share your thoughts in the comments below, and don't forget to subscribe for more awesome content. Happy tinkering, and see you in the next article!
Table of Contents
- Why Should You Connect Raspberry Pi to AWS IoT?
- What You'll Need to Get Started
- Setting Up Your Raspberry Pi
- Creating an AWS IoT Thing
- Installing AWS IoT SDK on Raspberry Pi
- Configuring AWS IoT Certificates
- Testing the Connection
- Advanced Features and Integration
- Troubleshooting Common Issues
- Conclusion